
HOW TO COOL A VAMPIRE CRAB PALUDARIUM IF IT’S TOO HOT

DIY Cooling system for any tank!
As things are starting to heat up pretty early this year, I’ve decided it’s time to make a DIY cooling system using some PC fans. While this system was originally for my reef tank, you can use the exact same concept for any aquarium or paludarium, including vampire crab setups.
If you're doing this for a paludarium, it’s usually better to set it up in a pull configuration so the fans suck hot air out of the tank rather than blow air in. This helps keep humidity from dropping too fast, but depending on your setup, it’s worth experimenting to see which direction works best. I’ve also listed quite a few other options for cooling down a paludarium in summer.
WILL VAMPIRE CRABS DIE IF IT’S TOO HOT?
While vampire crabs are fairly good with hot and humid environments, they can’t tolerate temperatures above 30c for extended periods of time. Short periods are fine, but prolonged periods above 30c will eventually kill them, starting with older crabs first. So, if you live in a place that gets quite hot, you need to be prepared to cool things down.
Easy Cooling Methods
Before we get into the build, here are a few quick and cheap ways to help cool a paludarium:
USB fans: Small desk or clip-on USB fans are easy to position and surprisingly effective, especially if you're working with a smaller tank. Something like this will work well I’d get two. Once for intake and one for exhaust. But will will be fine if you’re tight on cash.
Swap your glass lid for a mesh lid: This improves airflow and helps hot air escape, but you’ll need to mist more frequently to maintain humidity.
Run your lights at night instead of during the day: If your lighting setup puts out heat, flipping the schedule can help keep things cooler during peak temps.
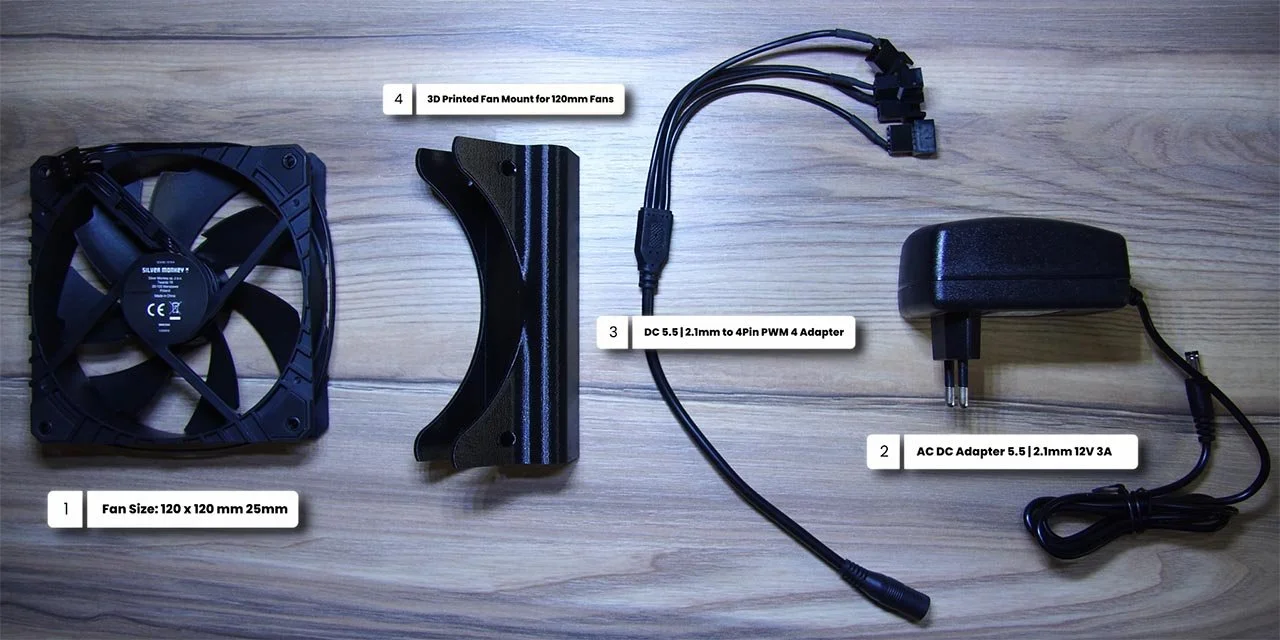
Complete Parts List for a DIY Tank Cooler
Make the voltage and sizes match your setup and choose the right plug (US or EU).
Power Adapter: 5.5x2.1 mm 12V 3A
4-Pin PWM Adapter: 5.5x2.1 mm DC adapter
3D Printer Files: (Check glass thickness)
PC FANS CHEAP: The cheapest option
PC FANS QUIET: The quietest option
To begin, you’ll need PC fans. I’m using 120 mm fans for this, but you can go bigger or smaller depending on what you’ve got. I’m using some cheap Silver Monkey fans: 120x120x25 mm, 1,800 RPM, 61.7 CFM airflow, with anti-vibration dampers. They’re 4-pin PWM fans. If you’re looking for something quieter, I highly recommend Be Quiet! fans. I have ten of them in my PC, and they live up to the name.
You’ll also need a power adapter. I’m using a 5.5x2.1 mm 12V 3A adapter from AliExpress. You’ll also need a 5.5x2.1 mm DC adapter to match your PWM fans. I’ll link that as well. I’m only using three fans for this build, but I picked up a 4-way splitter in case I want to add one more later on.
For mounting, I’m using 3D-printed brackets made for 120 mm fans. I’ll leave the STL files linked below, just be sure to pick the version that matches your glass thickness. I’m using the 5 mm size for mine.
Assembling Your DIY Tank Cooling System
Now it’s just a matter of screwing the fans into the brackets and plugging everything in. When mounting the fans, make sure they’re facing the right direction. If you’re using this for an aquarium, you’ll usually want them blowing across the water surface. But for a paludarium, especially one that needs to keep some humidity, it’s often better to have the fans pulling warm air out of the enclosure.
On most fans, the airflow blows out from the side with the support struts or manufacturer label, but always double-check before you mount everything.
Once your fans are mounted, connect them to the 4-pin PWM splitter. I’m running three fans, leaving one slot open in case I expand the system later.
Finally, plug the power adapter into the main connector and that’s it. Give it a quick test to make sure everything’s working. All three fans are spinning on mine. Just keep in mind that if you’re using high-speed fans, they’ll run at full blast unless you add a fan controller. If noise is a concern, quieter fans are worth the extra cost.
With everything up and running, it’s time to install the unit on your paludarium. Slide it onto the back or side of the glass, plug everything in, and you’re good to go. Just make sure nothing dips into the water or blocks your misting system.
Optimising Cooling and Power Consumption
I suggest running your fans on a timer during the hottest part of the day. For me, that’s around 10 a.m. to 8 p.m., depending on how hot the room gets.
If you want a more hands-off setup, use a temperature controller. These are inexpensive and will automatically turn your fans on when the tank hits a certain temperature, then off again once it cools.
Also, keep an eye on evaporation. Increased airflow means faster moisture loss, so if you’ve switched to a mesh lid or your fans are pulling a lot of air, you’ll need to mist more often to keep humidity in the right range. I’ll be switching from a glass lid to a mesh one for summer, which is another project for a future video.